Showing posts with label arduino tutorial. Show all posts

Tuesday, November 10, 2015

Using Servo Motor with Arduino

if you dont know how to simulate Arduino in Proteus Simulator click here to know or visit my previous post about using arduino in proteus. 

Arduino is an open source development board which is very good research and learning platform for technical and non technical person. It is very easy and comfortable to use in most of the situation from school project to the professional job. So it gives us knowledge about electronics and help develop idea of all age students. Learning arduino is awesome with enough hardware but sometimes we can not have all the component and arduino to research and design a project due to money and many thing so there is a solution of this problem.. We can design and code and test the system even if we dont have enough hardware. Yes we can solve it with computer having arduino IDE and proteus simulator.

WANT TO LEARN ABOUT ARDUINO AND ARDUINO BASED PROJECT,CLICK HERE..
So i tried here to present an idea about the same thing that how can we use arduino in proteus to design and code system.click here


The following tutorial helps you use servo motor with Arduino.

Servo motor and its application

Servo motor is an electronics motor which can only rotate up to 180 degree only.

Saturday, September 26, 2015

BIDIRECTIONAL MOTOR CONTROL USING L293D AND ARDUINO IN PROTEUS

INTRODUCTION

if you dont know how to simulate Arduino in Proteus Simulator click here to know or visit my previous post about using arduino in proteus. 

Arduino is an open source development board which is very good research and learning platform for technical and non technical person. It is very easy and comfortable to use in most of the situation from school project to the professional job. So it gives us knowledge about electronics and help develop idea of all age students. Learning arduino is awesome with enough hardware but sometimes we can not have all the component and arduino to research and design a project due to money and many thing so there is a solution of this problem.. We can design and code and test the system even if we dont have enough hardware. Yes we can solve it with computer having arduino IDE and proteus simulator. 
So i tried here to present an idea about the same thing that how can we use arduino in proteus to design and code system.

Monday, September 21, 2015

INTERFACING LCD WITH ARDUINO IN PROTEUS SIMULATOR STEP BY STEP

Introduction 

Arduino is an open source development board which is very good research and learning platform for technical and non technical person. It is very easy and comfortable to use in most of the situation from school project to the professional job. So it gives us knowledge about electronics and help develop idea of all age students. Learning arduino is awesome with enough hardware but sometimes we can not have all the component and arduino to research and design a project due to money and many thing so there is a solution of this problem.. We can design and code and test the system even if we dont have enough hardware. Yes we can solve it with computer having arduino IDE and proteus simulator. 
WANT TO LEARN ABOUT ARDUINO AND ARDUINO BASED PROJECT,CLICK HERE..
So i tried here to present an idea about the same thing that how can we use arduino in proteus to design and code system. Here is a project LCD interfacing with arduino in proteus . Try it at once and it will help you in big practical projects cause basic is fundamental.


Sunday, September 20, 2015

USING ARDUINO IN PROTEUS WITH TRAFFIC LIGHT PROJECT

Installing library file of arduino in proteus

Proteus is a popular circuit simulator which is used to design circuit in computer.
Arduino is an open source development board which is very good research and learning platform for technical and non technical person. It is very easy and comfortable to use in most of the situation from school project to the professional job. So it gives us knowledge about electronics and help develop idea of all age students. Learning arduino is awesome with enough hardware but sometimes we can not have all the component and arduino to research and design a project due to money and many thing so there is a solution of this problem.. We can design and code and test the system even if we dont have enough hardware. Yes we can solve it with computer having arduino IDE and proteus simulator. 
So i tried here to present an idea about the same thing that how can we use arduino in proteus to design and code system. Here is a project LCD interfacing with arduino in proteus . Try it at once and it will help you in big practical projects cause basic is fundamental. 
WANT TO LEARN ABOUT ARDUINO AND ARDUINO BASED PROJECT,CLICK HERE..

you should have proteus simulator and arduino ide installed in your computer.

  step one
 download proteus arduino library from the link given below.
https://drive.google.com/file/d/0B_kupfDZJEoObzA4Y1VvTjJ2cTg/view?usp=sharing

Wednesday, September 2, 2015

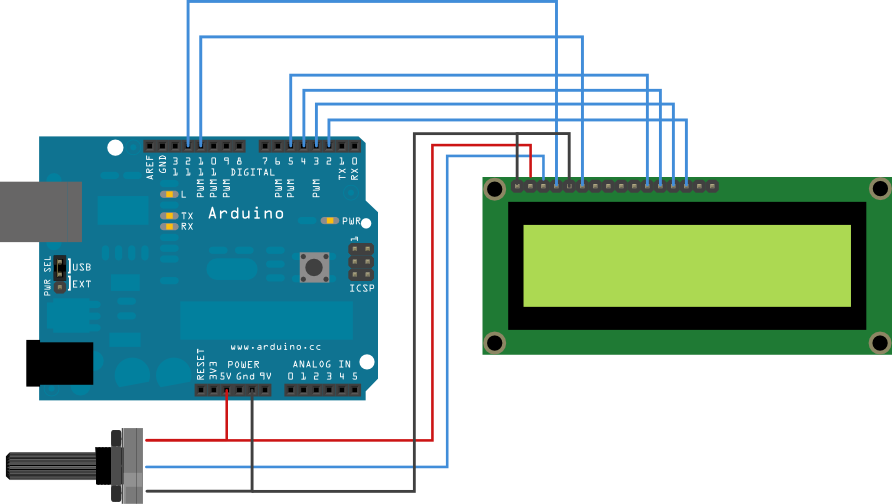
INTERFACING LCD WITH ARDUINO, ARDUINO BASIC

This is the basic idea of interfacing lcd with arduino. Idea is taken from the arduino official site.

Introduction 

The LiquidCrystal library allows you to control LCD displays that are compatible with the Hitachi HD44780 driver. There are many of them out there, and you can usually tell them by the 16-pin interface.
WANT TO LEARN MORE ABOUT ARDUINO AND ARDUINO BASED PROJECT, CLICK HERE..

This example sketch prints "Hello World!" to the LCD and shows the time in seconds since the Arduino was reset.

Thursday, August 27, 2015

Arduino Based Voting System

Normal type of voting system is ancient and time consuming. The probability of getting error is also greater in that system. So use of embedded system makes the work technical, easy and yet reliable.  The complexity and robustness of a voting system depends on the number of voters involved. Here you could see a simple Arduino based voting system that would be a great fit for small-scale elections such as in schools or colleges. This system was designed to ensure security and the coolest thing is the whole voting process can be done with assembled hardware and Arduino IDE.
This voting system takes vote inputs from pins A2 to A5 of Arduino. A LCD used to show candidates name which was connected in 4 bit mode to the Arduino.

Friday, July 17, 2015

Temperature sensor circuit using Arduino

Introduction
Temperature sensor circuit can give us information about the temperature of any place(where we place the circuits) and we can control any thing which are function of temperature like Fan etc. The circuit gives us the information when the temperature of any place exceeds the set temperature.
Components Required
1. Arduino(i used Uno)
2. Temperature sensor(Thermistor)
3. Resistor about 2.2k
4. led or Motor
5. BC547 transistor

Monday, July 6, 2015

Clap sensitive switch using Arduino((basic version)

The circuit diagram of the circuit is shown in the diagram below.


The code of clap sensitive circuit is shown below. the mic and a 47 k resistor are connected in series making voltage divider and the divided voltage is sent to the analog input pin A0 of the arduino. the led is joined in pin 12 of digital i/o line of arduino. to make it work open the serial monitor and check the value without clapping and with clapping and eg if the value show is 30 without clapping and 500 with clapping then write val > 50 in if else statement. the working video of the circuit is at youtube . click the following link https://www.youtube.com/watch?v=oi7IaTbd9Gs

int clapsense=A0;
int led=12;
int state=LOW;